Documentation Index

Fetch the complete documentation index at: https://docs.sigmamind.ai/llms.txt

Use this file to discover all available pages before exploring further.

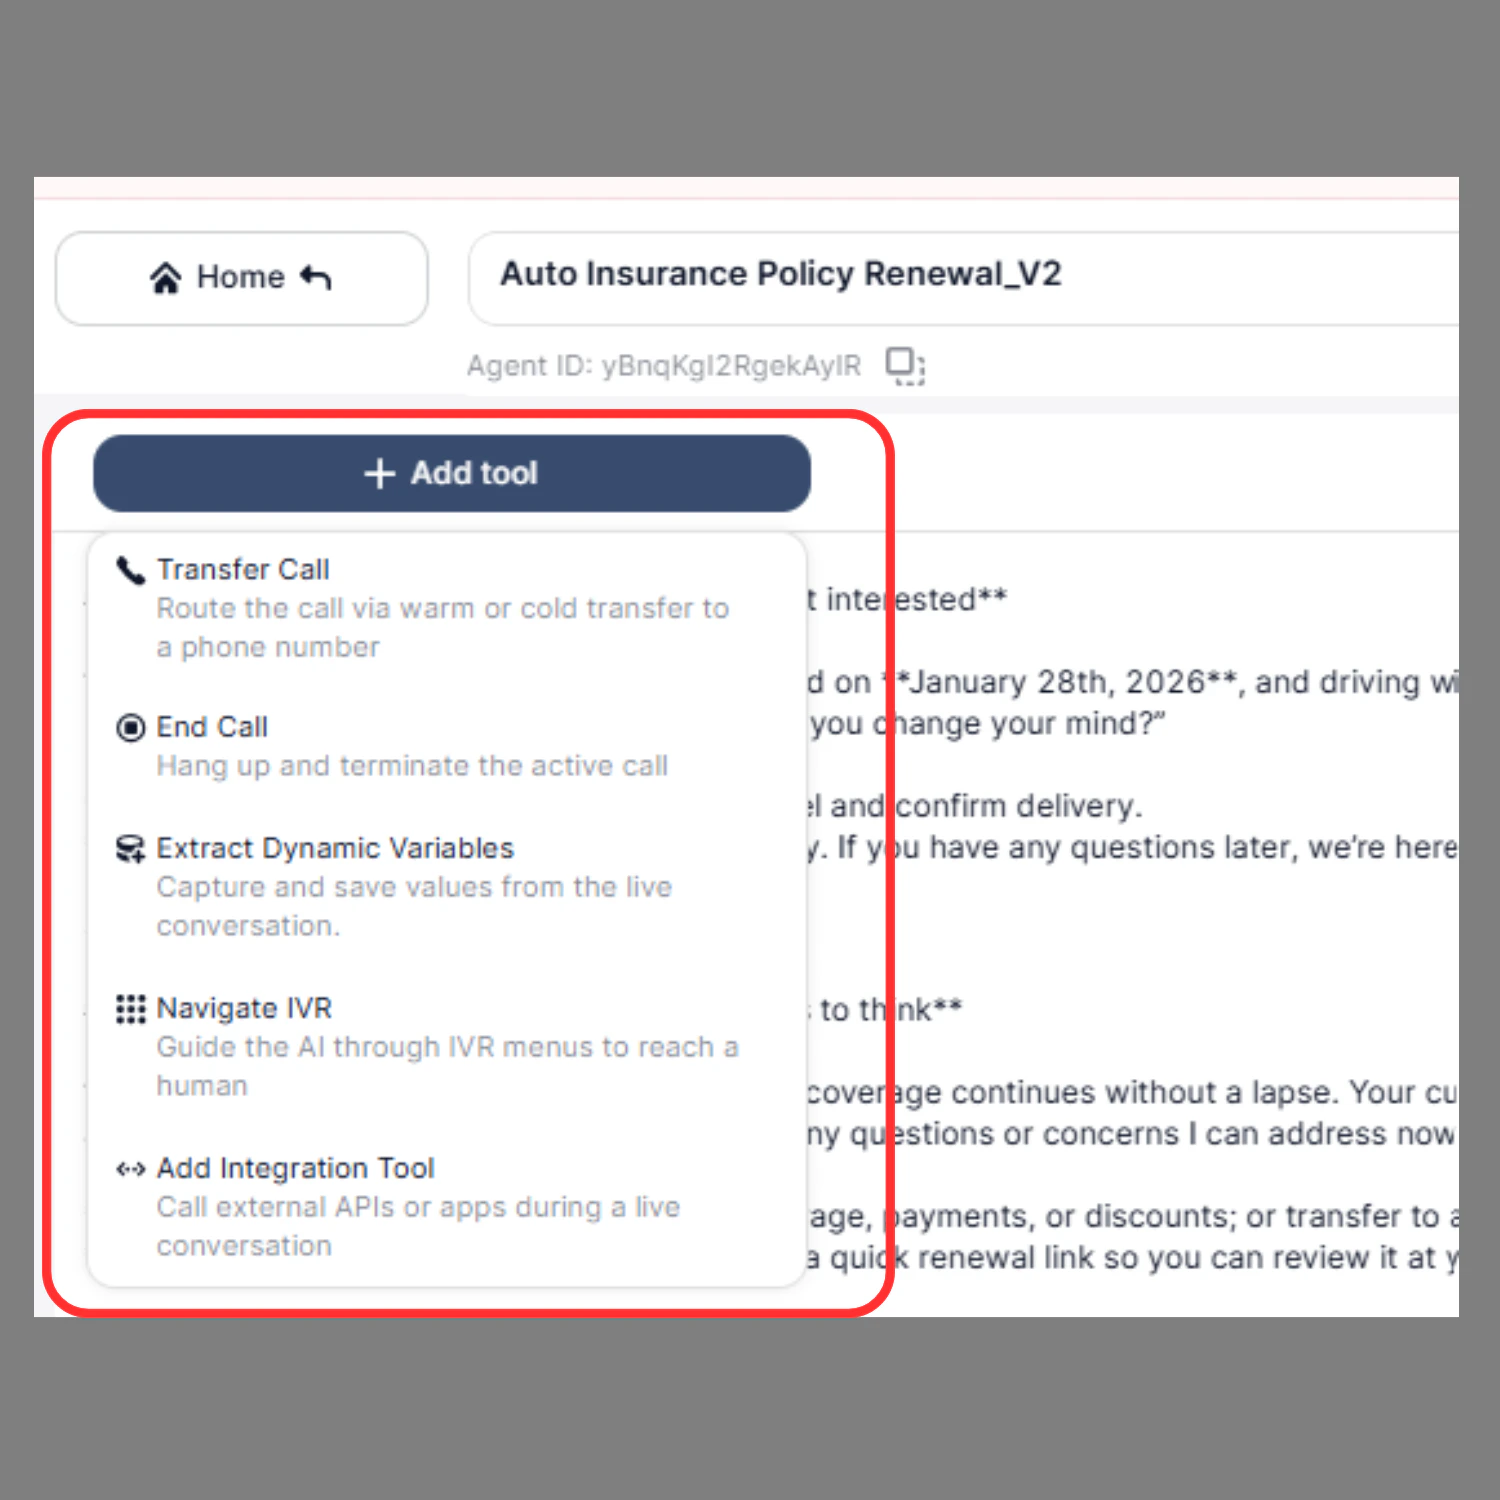
Function calls allow the agent to perform real actions such as booking appointments or transferring calls.
Addtool 1
SigmaMind supports three function call types:
  • Voice Tool
  • Extract Variables
  • Integration Tool

Voice Tool Calls

Voice Tool Calls allow the agent to control the call flow, such as transferring the call to a human agent or ending the call programmatically.
Updatevoicetoolcall
To configure:
  1. Click Add tool
  2. Select Voice Tool Call
  3. Select Action
    • ivr_navigator
    • voice_transfer_call
    • voice_end_call
  4. Configure the required fields
  5. Click Add to Agent to save the tool configuration
You can perform the following actions:
  • ivr_navigator
  • voice_transfer_call
  • voice_end_call

IVR Navigator

Enable your AI agent to navigate IVR systems and make outbound calls like a human caller. The agent sends keypad inputs (DTMF) when required, responds naturally when prompted for speech, and seamlessly continues the interaction if a human agent joins.
Ivr 1

How It Works

When an outbound call is placed, the receiving system may respond with:
  • A traditional IVR menu
  • A conversational AI system
  • A live human agent
  • Or a combination of all three
IVR Navigator enables the agent to handle these transitions within a single call. The core decision the agent must make is:

Press vs. Say

  • If the IVR says “Press 1 for English”
    → The agent sends a keypad digit using IVR Navigator
  • If the IVR says “Say 1” or asks a question
    → The agent responds using normal speech
This distinction is critical for correct navigation.

Supported IVR Types

Press-type
”Press 1 for X, Press 2 for Y”
→ IVR Navigator is triggered
Say-type
”Say 1 for English” or open-ended prompts
→ Handled via normal speech (no tool call)
Conversational AI
Acts like a human and asks questions
→ IVR Navigator is used only if numeric input is explicitly required
Mixed (IVR + Human)
IVR transitions to a human and may return to keypad input
→ IVR Navigator is triggered only for digit-based steps

How to Configure

Step 1: In Agent Builder, go to Add Tool Step 2: Select the Voice Tool and add ivr_navigator as a tool. Step 3: Add a Description to define when the agent should trigger ivr_navigator. Recommended:
Always call this tool only when the IVR explicitly asks for numeric input (e.g., “press” or “enter” a digit/number).
Do NOT call this method for spoken responses or unclear prompts.
Step 4: Set IVR starts conversation? (Yes / No)
Specify whether the IVR system begins speaking at the start of the call.
  • Yes → Use this when the call starts with an IVR greeting or menu.
    The agent will wait for the configured Pause Delay before processing, ensuring the full message is received.
  • No → Use this when no initial IVR delay handling is needed.
    The agent will begin processing immediately.
Step 4: Set pause_delay
Defines how long (in milliseconds) the agent waits after IVR speech before taking action.
IVR systems often deliver menu options in fragments with short pauses. Without a delay, the agent may act too early. Recommended: 2000 ms Step 4: Click on Add to Agent Useful for workflows that prioritize connecting only to human agents.
Ivr2 1

Step 4: Write your agent system prompt

All navigation logic, goals, and behavioral constraints should be defined in the agent’s system prompt.

Agent Prompt Guide

Define the goal

Clearly specify what the agent must achieve. Example:
Navigate the IVR system, retrieve required information, complete necessary inputs, and connect to a human agent if needed.
If the IVR structure is known, include the expected flow. This significantly improves reliability. Example:
  • Select language
  • Select account type
  • Select service category
  • Proceed to the target function

Pass caller data as dynamic variables

Provide structured data that the agent may need during the call:
  • Mobile number
  • Reference or account number
  • Policy or claim ID
  • Verification details (e.g., last 4 digits of SSN)
Set the agent persona Without a defined persona, the agent may behave incorrectly (e.g., like a support agent). Recommended instruction: The agent should behave as a caller seeking assistance.
It should not act as a support representative or provide solutions, explanations, or guidance.

Behavioral Guidelines

To ensure reliable IVR navigation:
  • Only act when input is explicitly requested
  • Do not respond to informational (e.g., hold music, “please wait”)
  • Do not guess or assume menu options
  • Do not press fallback keys (e.g., 0 or 9) unless explicitly instructed
  • Separate digit input actions from spoken responses
Digit inputs are irreversible once sent

Example prompt:

## IVR Interaction Rules

### 1. Informational / Transitional Prompts
If the prompt is informational (e.g., hold music, “please stay on the line”, “processing”, ringing):
- Return: `NA`
- Do not press any digits
- Do not speak
- Do not trigger IVR navigation

### 2. Input Mode Decision (Highest Priority)

Speech Input
- If the IVR says “say”, “speak”, “tell me”, or asks a question:
  - Respond naturally as a caller
  - Do NOT trigger IVR navigation

DTMF Input (Keypad)
- If the IVR says “press”, “enter”, or asks for numbers:
  - Trigger IVR navigation with the required digits only
  - Do NOT generate a spoken response


## Caller Role
- Act as a normal caller (not a support agent)
- Do not provide explanations, solutions, or guidance

## Goal
- Navigate AutoProtect IVR
- Retrieve claim status
- Provide required inputs correctly
- Connect to a human agent

## Input Data
- Claim Reference Number: `123456`
- ZIP Code: `560001`
- Last 4 Digits of SSN: `1234`

## Preferred Navigation Path
`English → Existing Policyholder → Claims → Existing Claim Status → Enter Details → Get Status → Representative`

## Navigation Constraints
- Only press digits explicitly mentioned
- Do not press `9` (repeat/back) unless instructed
- Do not press unrelated digits
- Do not change menu path

## After Transfer to Agent
- Briefly state you are checking claim status
- Answer questions concisely
- Do not provide extra details unless asked

Voice Transfer Call

This feature works only for phone calls and is not supported for web calls.
The Voice Transfer Call action allows the agent to transfer an active call to another agent, team, or phone number when escalation or human assistance is required. This ensures a smooth handoff experience by optionally sharing conversation context with the receiving agent before connecting the user.

Use this action when:

  • The user asks to speak with a human agent
  • The request requires human intervention
  • The conversation needs escalation to a specialist
  • The workflow requires routing to another department (Sales, Support, Billing, etc.)

How to Configure

Step 1: Select Action

The Select the action dropdown allows you to choose which voice function the agent should perform. Select: voice_transfer_call
Transfercall
This enables the call transfer configuration.

Step 2: Transfer To

Defines where the call will be transferred.
Transferto
You can use a static phone number or a dynamic variable. Static example – Transfer to support team:
+919876543210
Transfer to the assigned agent using the variable:
{{assigned_agent_number}}
The transfer phone number must be entered in E.164 international format, including the country code.

Step 3: Transfer Types

SigmaMind provides two transfer types: Cold Transfer for immediate routing and Warm Transfer for assisted handoff with context.
Transfertype

Cold Transfer

Cold transfer immediately connects the caller to the destination number. Behavior:
  • AI transfers the call and exits the conversation
  • No context is shared with the receiving agent
  • Caller hears ringing and connects directly
Use when:
  • Context is not required
  • Simple routing to support or department
  • Fast escalation is needed

Warm Transfer

Warm transfer connects the receiving agent first, shares context, and then bridges the caller. This provides a smoother and more professional experience. Warm transfer includes two stages: Connecting Stage and Bridged Stage
Twostage

Stage 1: Connecting Stage

The receiving agent is connected, but the user is still on hold.

Whisper Message

A private message played only to the receiving agent. The user cannot hear this message. You can configure this as Static or Prompt.
Whispermessage
To enable Whisper Message
  1. Turn the Whisper Message toggle ON
  2. Enter the message in the text box
  3. Choose either:
  • Static – fixed message, or
  • Prompt – dynamically generated message using variables
Once enabled, this message will be played only to the human agent. The caller will not hear it.

Static Whisper Message Example

You are being connected to a customer regarding an insurance renewal request. Please review and assist the 
Static Message with Variables Example:
You are being connected to {{customer_name}} regarding insurance policy {{policy_id}}. The customer wants assistance with {{request_type}}.

Prompt Whisper Message Example

Prompt messages are generated dynamically based on conversation context. Instead of sending fixed text, you provide instructions, and SigmaMind AI automatically creates a contextual summary for the receiving agent. Prompt example configuration:
Summarize the customer's request and include their name, issue, and requested service.
What the system generates automatically (example output):
Customer name is Rahul Sharma. He is calling to renew his car insurance policy and wants clarification on premium pricing and coverage details.
Prompt Configuration Example (with Variables):
Provide a short summary for the receiving agent. Include customer name {{customer_name}}, service {{service_type}}, and request {{customer_request}}.
This ensures the receiving agent has full context.
If the whisper message is left empty, the transfer will still proceed, but no context will be shared. In this case, the warm transfer effectively behaves like a cold transfer.

Stage 2: Bridged Stage

The Bridged Stage is the phase in a Warm Transfer where the caller and the human agent are fully connected and can speak to each other directly. At this stage, the transfer is complete, and the conversation moves from the AI agent to the human agent. You can optionally enable a Three-way Message to announce the connection and ensure a smooth and professional transition for both participants. The Three-way Message allows the AI agent to play a message to both the caller and the human agent after the call is connected.
Bridgedstage
You may enable a Bridge Message (Three-Way Message). To enable the Three-way Message:
  1. Turn the Three-way Message toggle ON
  2. Enter the message in the text box
  3. Choose either:
  • Static – fixed announcement message, or
  • Prompt – dynamically generated message using variables
Once enabled, this message will be heard by both the caller and the human agent, ensuring a clear and professional transition. static 3-way Message Example:
Thank you for waiting. You are now connected to our support specialist.
static 3-way Message Example (with variables):
Thank you for waiting {{customer_name}}. You are now connected to our support specialist.
prompt 3-way Message Example:
Generate a short, clear, and neutral three-way message to be played to both the customer and the agent after a call is bridged. The message should confirm that the connection is complete and invite the conversation to continue. Keep the tone professional and concise.
prompt 3-Way Message Example (with variables):
Generate a short, clear, and neutral three-way message to be played to both {{customer_name}} and the agent after the call is bridged. The message should confirm that {{customer_name}} is now connected with the {{agent_role}} regarding {{call_reason}}. Keep the tone professional, concise, and welcoming, and invite the conversation to continue.
Both participants hear this message and ensure a smooth transition.
All variables must always be defined using double curly braces: variable_name.

Step 4: Custom Headers(Optional)

Custom Headers allow you to send structured metadata along with the call transfer.

These headers are invisible to the customer but available to
Customheader
  • Receiving agents
  • CRM systems
  • Call center software
  • Backend systems

    Headers provide structured context for automation and reporting.

    How Custom Headers Work Headers are sent as key-value pairs.
Example:
X-Intent: billing_issue
X-Language: hi
X-Customer-Type: existing
X-Ticket-ID: 12345
X-Call-Source: campaign
This helps backend systems and agents track the request.

Step 5: Click Add to Agent

If the agent does not answer or the transfer fails due to network issues, SigmaMind automatically retries the transfer based on the configured settings.

Execution Flow

Customer requests transfer → Specialist connected → Whisper message played → Customer connected → Three-way message played → Specialist continues conversation

Best Practices

  • Use Warm Transfer for better customer experience
  • Use Prompt Whisper Message to provide dynamic context
  • Keep messages clear and concise
  • Use dynamic variables for intelligent routing
  • Provide useful context to receiving agents

Voice End Call

This function allows the agent to end the call automatically when the conversation is complete or the user no longer needs assistance. This ensures a clean and professional call termination without requiring manual intervention.
Endcall
To configure:
  1. Click Add tool
  2. Select Voice Tool Call
  3. Select Tool → voice_end_call
  4. Click Add to Agent
Call this function when:
  • Conversation is complete
  • Task or request has been successfully finished
  • User confirms no further help is needed
  • User says goodbye or wants to end the call
  • User is frustrated or does not want to continue
  • Call needs to be terminated gracefully
Example prompt instruction:
Call "voice_end_call" when the user is not interested, or the user is frustrated and wants to end the call.

Extract Variables

Extract Variables allow the agent to capture and store important information from the conversation, such as customer name, phone number, or appointment details. Please note that this is useful when the call and chat are still going on, and it has not yet completed.
Ev
To configure:
  1. Click Add tool
  2. Select Extract Variable
  3. Configure the required fields
  4. Click Add to Agent to save the tool configuration
Variables must be defined using double curly braces:
{{variable_name}}
Examples:
{{customer_name}}

{{phone_number}}

{{appointment_date}}
When the agent collects this information during the conversation, SigmaMind automatically extracts and stores the values for use in function calls, integrations, and workflows.

Integration Tool

Integration Tool Calls allow the agent to interact with external applications such as booking systems, CRM, or databases. Use App Tool Calls when the agent needs to fetch data, create records, or perform actions outside the conversation.
Addapp
To configure an App Tool Call:
  1. Click Add Tool Call
  2. Select Integration Tool
  3. Choose the App
  4. Select the tool (function to call)
  5. Add a Description to define when the function should be called(optional)
  6. Click Add to Agent
Examples:
  • get_available_slots
  • book_appointment
  • update_crm

Function Description Field (Optional)

Each function includes a Description (When to call this function) field.
Description
This field provides additional guidance. Example:
Call this function after collecting the appointment date