> ## Documentation Index
> Fetch the complete documentation index at: https://docs.sigmamind.ai/llms.txt
> Use this file to discover all available pages before exploring further.
# Create a Campaign
> Step-by-step guide to create and configure outbound call campaigns in SigmaMind.
Use this process to set up and launch a call campaign through **SigmaMind**.
Campaigns can be created via the **Dashboard** or **API**.
## Dashboard
***
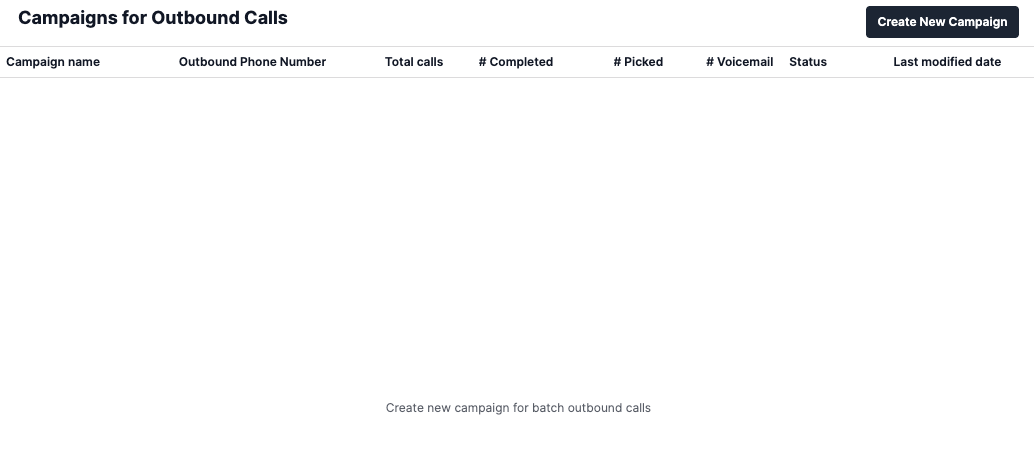
### Step 1: Navigate & Initiate
* Go to the **Campaign Calls** section in your SigmaMind dashboard.  * Click **Create New Campaign**.\\
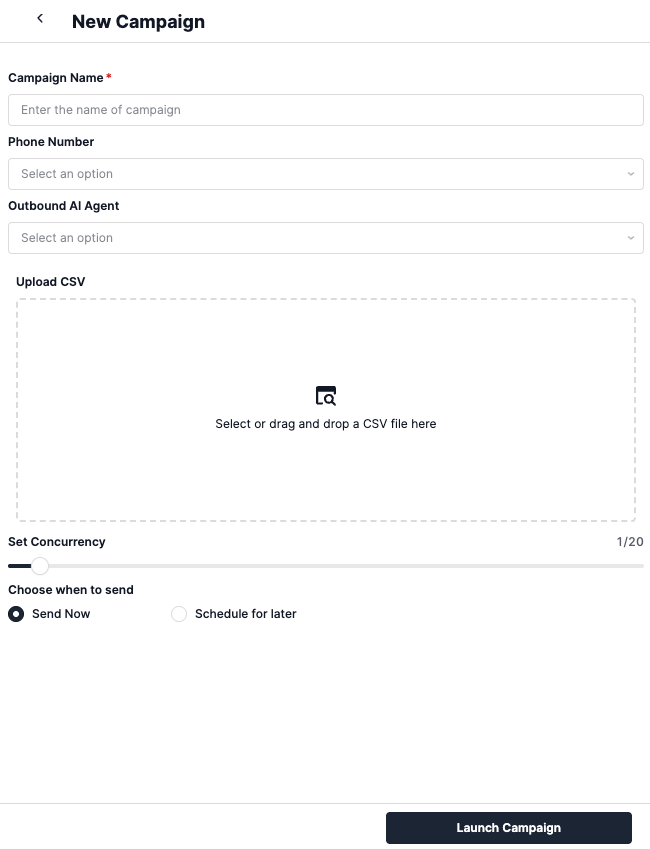
 ### Step 2: Configure Campaign Name and Phone Number
* Enter a **Campaign Name** to help identify the campaign later.
* Select or enter the **Phone Number** you want as the caller ID.
* The number must already be purchased and bound in your system.
### Step 3: Assign an Outbound Agent
* Add the `agentId` of the outbound agent that should run this campaign.
* This ensures calls run within the context of the selected agent.
### Step 4: Upload a File
* Prepare a **CSV file** with a header row:
* Minimum required column: Phone Number.
* Additional columns (e.g., `First Name`, `City`) can be used as template variables like `{{first_name}}`.
```csv theme={null}
Phone Number,First Name,City
+14150000001,Alex,New York
+14150000002,Maria,San Francisco
```
Use the provided CSV template for consistency, or upload your own with custom headers.
### Step 5: Choose When to Send
* **Send Now**: Start the campaign immediately.
* **Schedule for Later**:
* Define scheduledDate and scheduledTime.
* Provide a scheduledTimezone to ensure accurate scheduling.
### Step 6: Limit Concurrent Calls
* Set the concurrentCalls parameter (1–20).
* Controls how many calls run simultaneously.
Use lower concurrency for testing or sensitive campaigns. Use higher concurrency for large-scale campaigns.
### Step 2: Configure Campaign Name and Phone Number
* Enter a **Campaign Name** to help identify the campaign later.
* Select or enter the **Phone Number** you want as the caller ID.
* The number must already be purchased and bound in your system.
### Step 3: Assign an Outbound Agent
* Add the `agentId` of the outbound agent that should run this campaign.
* This ensures calls run within the context of the selected agent.
### Step 4: Upload a File
* Prepare a **CSV file** with a header row:
* Minimum required column: Phone Number.
* Additional columns (e.g., `First Name`, `City`) can be used as template variables like `{{first_name}}`.
```csv theme={null}
Phone Number,First Name,City
+14150000001,Alex,New York
+14150000002,Maria,San Francisco
```
Use the provided CSV template for consistency, or upload your own with custom headers.
### Step 5: Choose When to Send
* **Send Now**: Start the campaign immediately.
* **Schedule for Later**:
* Define scheduledDate and scheduledTime.
* Provide a scheduledTimezone to ensure accurate scheduling.
### Step 6: Limit Concurrent Calls
* Set the concurrentCalls parameter (1–20).
* Controls how many calls run simultaneously.
Use lower concurrency for testing or sensitive campaigns. Use higher concurrency for large-scale campaigns.
 ## API
If you prefer programmatic control, you can use our APIs.\
Refer to the [Create Campaign API Reference](/api-reference/campaigns/create-campaign) for details on all available parameters.
* The CSV file must be uploaded as `multipart/form-data`.
* The `file` parameter should contain the path to your CSV file.
* The `concurrentCalls` parameter controls how many calls run simultaneously (1-20).
* The `isScheduled` parameter determines if the campaign starts immediately or at a scheduled time.
* If scheduling, provide `scheduledDate`, `scheduledTime`, and `scheduledTimezone`.
* Ensure the `sipPhoneNumber` is a valid number in your SigmaMind account.
* The `agentId` must correspond to an existing outbound agent in your system.
```sh Create Campaign theme={null}
curl --location 'https://api.sigmamind.ai/v1/campaigns' \
--header 'X-API-KEY: key_C6HL3Goru7Q.TlI5kZOKPmDM03Gt39nRBEnx************************' \
--form 'campaignName="New Campaign"' \
--form 'sipPhoneNumber="+14150000001"' \
--form 'agentId="D5D0p7TUs66TTAEA"' \
--form 'file=@"/Users/ambujaak/Desktop/work/NOTES/Sample/local/campaign_appointment_booking.csv"' \
--form 'isScheduled="false"' \
--form 'scheduledDate=""' \
--form 'scheduledTime=""' \
--form 'scheduledTimezone=""' \
--form 'concurrentCalls="2"'
```
## API
If you prefer programmatic control, you can use our APIs.\
Refer to the [Create Campaign API Reference](/api-reference/campaigns/create-campaign) for details on all available parameters.
* The CSV file must be uploaded as `multipart/form-data`.
* The `file` parameter should contain the path to your CSV file.
* The `concurrentCalls` parameter controls how many calls run simultaneously (1-20).
* The `isScheduled` parameter determines if the campaign starts immediately or at a scheduled time.
* If scheduling, provide `scheduledDate`, `scheduledTime`, and `scheduledTimezone`.
* Ensure the `sipPhoneNumber` is a valid number in your SigmaMind account.
* The `agentId` must correspond to an existing outbound agent in your system.
```sh Create Campaign theme={null}
curl --location 'https://api.sigmamind.ai/v1/campaigns' \
--header 'X-API-KEY: key_C6HL3Goru7Q.TlI5kZOKPmDM03Gt39nRBEnx************************' \
--form 'campaignName="New Campaign"' \
--form 'sipPhoneNumber="+14150000001"' \
--form 'agentId="D5D0p7TUs66TTAEA"' \
--form 'file=@"/Users/ambujaak/Desktop/work/NOTES/Sample/local/campaign_appointment_booking.csv"' \
--form 'isScheduled="false"' \
--form 'scheduledDate=""' \
--form 'scheduledTime=""' \
--form 'scheduledTimezone=""' \
--form 'concurrentCalls="2"'
```